If your backyard isn’t perfectly flat, you’re not alone. Uneven yards are more common than level ones, especially in rural or sloped areas. But don’t worry an uneven yard doesn’t mean you can’t enjoy the beauty, functionality, and convenience of a quality shed. It just means you’ll need to plan a little more carefully before delivery day.
At Schrock Buildings, we’ve delivered and installed sheds in every imaginable terrain across the Midwest. We know what it takes to make sure your shed is placed securely, efficiently, and correctly even if your yard isn’t picture-perfect.
This guide walks you through everything you need to know about preparing an uneven backyard for a smooth shed delivery. Whether you’re planning to order soon or just getting started with research, this step-by-step guide will help you feel confident and informed.
Why It’s Important to Prepare an Uneven Site

An uneven backyard can lead to issues if it’s not properly prepped for a shed installation. A shed that isn’t level can cause:
Structural stress and warping
Door and window misalignment
Water pooling under or around the shed
Shortened shed lifespan
Voided warranty due to improper installation
Preparing the ground the right way ensures your shed lasts for decades, performs as expected, and stays aligned. It also helps us, the delivery crew, complete your install efficiently and safely.
Step 1: Assess the Slope and Terrain
Start by walking around the area where you want your shed. Take note of the following:
Is it sloping in one direction or several?
Are there low spots that collect water?
Are there tree roots, rocks, or debris in the way?
Is the ground soft, sandy, or solid?
Use a long 2×4 board and a level to measure the slope across your site. This helps you understand how much ground leveling or foundation work you’ll need. If the slope is more than 6 inches across the shed’s footprint, you’ll need to plan for grading or a raised foundation.
Tip: Snap a few photos and jot down your measurements. These will come in handy when you contact us for a free shed consultation.
Step 2: Choose the Right Foundation Type for Your Terrain
Every shed needs a stable foundation. On uneven ground, the foundation choice becomes even more important. At Schrock Buildings, we recommend three main options for uneven yards:
1. Gravel Pad with Retaining Perimeter
A gravel pad is a flexible, cost-effective option. It allows water to drain through and provides a level surface for your shed. To use this on an uneven yard, you’ll need to:
Excavate the high side to lower it
Use treated timbers or concrete blocks to create a border
Fill the area with compacted gravel
This method is ideal for mild to moderate slopes.
2. Concrete Piers or Blocks
Concrete piers or deck blocks can be placed at each corner and along the sides of the shed. These can be adjusted in height to match the slope. The shed then sits on treated wooden skids or joists that span the blocks evenly.
This approach minimizes site disturbance and works well for steeper grades.
3. Elevated Deck or Platform
In cases of extreme slope or soft ground, an elevated wooden platform may be the safest and most practical solution. This involves building a raised frame supported by posts anchored into the ground. Your shed is then built or delivered on top of this deck.
This approach costs more upfront but ensures stability and proper drainage on difficult terrain.
Step 3: Clear and Mark the Site
Before any leveling or installation can take place, you’ll need to clear the space where the shed will go. This includes:
Removing grass, brush, and weeds
Pulling out large rocks, stumps, or roots
Clearing overhanging branches or nearby fencing
Marking off the shed’s perimeter with flags or stakes
This allows the site to be leveled and gives our crew the space they need for delivery and setup.
Step 4: Plan for Drainage
Water is the number one enemy of long-term shed performance. Uneven terrain often increases the risk of water pooling or runoff near your shed. To avoid this:
Grade the surrounding area slightly away from the shed site
Use crushed gravel to allow water to drain underneath
Consider installing a simple French drain if needed
At Schrock Buildings, our experienced team can help you design a site that stays dry year-round.
Step 5: Make Sure There’s Access for Delivery
Even if your shed site is ready, we still need a clear path to reach it. Walk your property and confirm:
There’s a minimum of 1–2 feet of clearance on each side of the shed
No trees, fences, or landscaping block the route
The ground is firm enough to support a delivery trailer or Mule machine
If you have concerns about access, just let us know. We’re happy to review your site with you before your scheduled delivery date.
Step 6: Consider Adding a Shed Base Package
Don’t want to deal with all this prep work yourself? Good news. Schrock Buildings offers professional shed foundation prep as part of our Shed Base Packages. We’ll handle:
Site grading
Gravel pad installation
Foundation leveling
Clean-up
That means you get the peace of mind that comes with a professionally prepped site and shed delivered by experts.
Step 7: Use Our 3D Shed Builder Tool to Visualize Your Perfect Fit
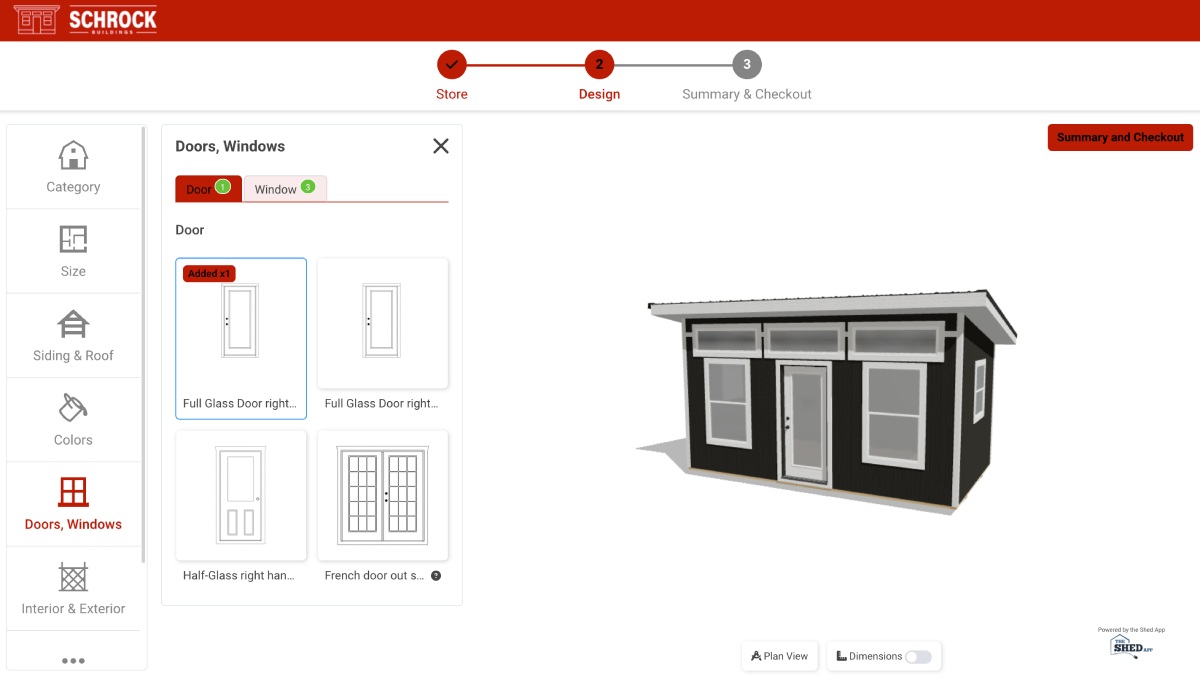
While you’re getting your backyard ready, why not start designing your dream shed? Our online 3D Shed Builder Tool lets you:
Choose the style, size, and colors
Add windows, doors, and custom features
Get instant quotes and save your designs
It’s easy, fun, and a great way to see how your future shed will look in your yard — no matter the terrain. You can even send your design directly to our team for review and personalized advice.
Try it out today and see just how simple shed buying can be.
Why Choose Schrock Buildings?

When you buy from Schrock Buildings, you’re not just getting a shed. You’re getting quality, care, and craftsmanship. Here’s what makes us different:
Custom builds tailored to your specific needs
Top-grade materials designed for long-term durability
Experienced crews that handle complex delivery scenarios
Honest advice about the best site prep and foundation options
Local expertise from a trusted Ohio-based builder
We’ve built our reputation by helping people get exactly the right shed for their property — with a process that’s smooth, transparent, and enjoyable.
Common Mistakes to Avoid When Prepping Uneven Ground
Here are a few things to avoid when getting your backyard ready for a shed:
Skipping site leveling. Even a small slope can cause long-term issues if ignored.
Using the wrong foundation. Each yard needs a tailored solution, not a one-size-fits-all fix.
Overlooking drainage. Water can cause damage faster than most people realize.
Poor access planning. If we can’t get the shed to the spot, installation gets delayed.
Doing it all yourself. When in doubt, it’s best to call in our experienced team for help.
Avoiding these mistakes saves you time, money, and stress in the long run.
Ready to Get Started?
Preparing an uneven backyard for shed delivery doesn’t have to be complicated. With a little planning and help from the professionals at Schrock Buildings you’ll have a strong, level foundation and a beautiful shed that stands the test of time.
Start designing your ideal shed now with our interactive 3D Shed Builder Tool and explore all your options. If you have questions or want help with site prep or installation, contact us today. Our friendly team is ready to walk you through the process and ensure everything goes smoothly from start to finish.